Table of Contents
QUICK SUMMARY:
Keyword ranking history tracks a website's positions in search engine results over time for specific keywords. This history reveals ranking fluctuations, offering insights into SEO strategy effectiveness and responses to changes in algorithms or market trends. Understanding this evolution aids in identifying trends and optimizing SEO efforts. This article provides tips on how to use the AgencyAnalytics Rank Tracker to access keyword ranking history, unlocking SEO success for clients.
It’s one thing to understand the current, up-to-date keyword rankings for your client’s top-priority keywords. It’s another to use keyword ranking history to understand how those search positions have changed over time. Highlighting improvements and spotting issues are two of the biggest advantages of being able to look back in time at the historical rankings of your client’s website.
Don't let that valuable ranking history slip away! For agencies, it's essential to have access to historical ranking data to track the progress and performance of your clients’ targeted keywords.
With an accurate and comprehensive rank tracker, easily monitor and analyze the ranking history of individual keywords–at scale. And simply by clicking on any specific keyword, unlock its complete ranking history and gain valuable insights into its performance over time.
This article answers the most common questions about AgencyAnalytics’ Rank Tracker Tool:
Why Agencies Need a Historical Ranking Tool
Website ranking history is vital for agencies as it enables:
Performance Analysis: Historical ranking data allows agencies to analyze the progress and performance of keywords over time. By comparing current rankings with past rankings, agencies can identify trends, fluctuations, and patterns, enabling them to make data-driven decisions and optimize their SEO strategies effectively.
Client Reporting: Historical ranking history adds depth and context to your agency’s white labeled SEO reports, demonstrating the progress made and the value delivered. Clients can see the improvements in their keyword rankings over time, which helps build trust and strengthens the agency-client relationship.
Strategy Refinement: Tracking historical ranking data enables agencies to assess the effectiveness of different optimization techniques and strategies employed over time. By identifying what worked and what didn't, agencies refine their approaches and focus on tactics that yield the best results, enhancing their overall SEO performance.
Adapting to Algorithm Updates: Search engine algorithms frequently change, impacting keyword rankings. Historical ranking history helps agencies understand the impact of algorithm updates on their keywords. By analyzing historical data, agencies can correlate ranking fluctuations with algorithm updates, adjust their strategies, and adapt to the evolving search landscape.
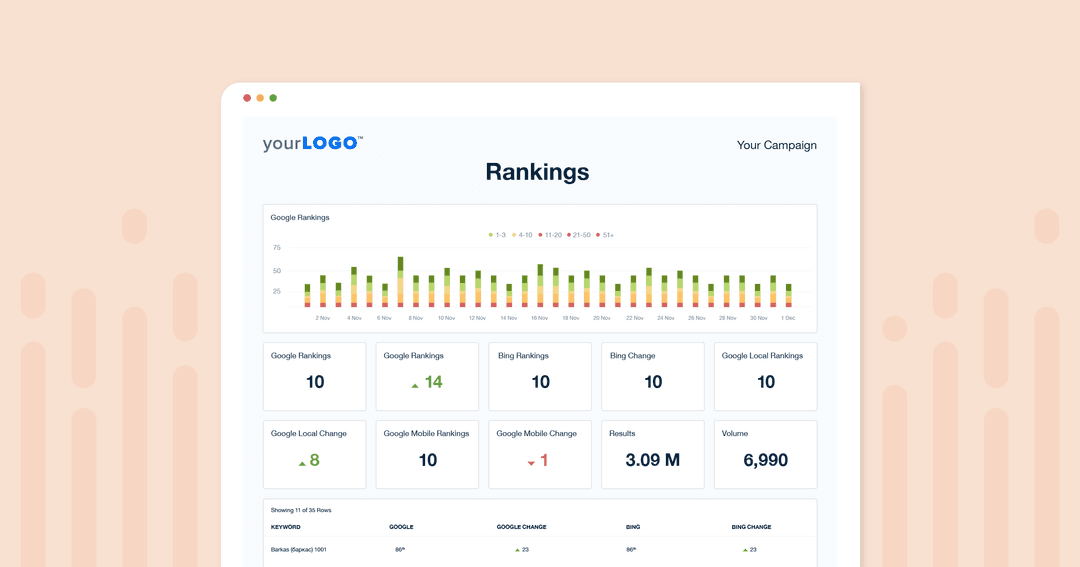
By leveraging historical data, agencies make informed decisions, demonstrate progress to clients, and optimize their SEO efforts for long-term success. But they need to do all this at scale. That’s where a rank tracker tool comes in. A visual dashboard gives agencies a visual overview of every clients’ keyword ranking performance, allowing them to optimize their SEO efforts with ease.
Within the AgencyAnalytics platform, distinct numerical SERP ranges are represented by color-coded bars, which are as follows:
Dark green = # of keywords in positions 1-3
Light green = # of keywords in positions 4-10
Yellow = # of keywords in positions 11-20
Orange = # of keywords in positions 21-50
Red = # of keywords in positions 51-100
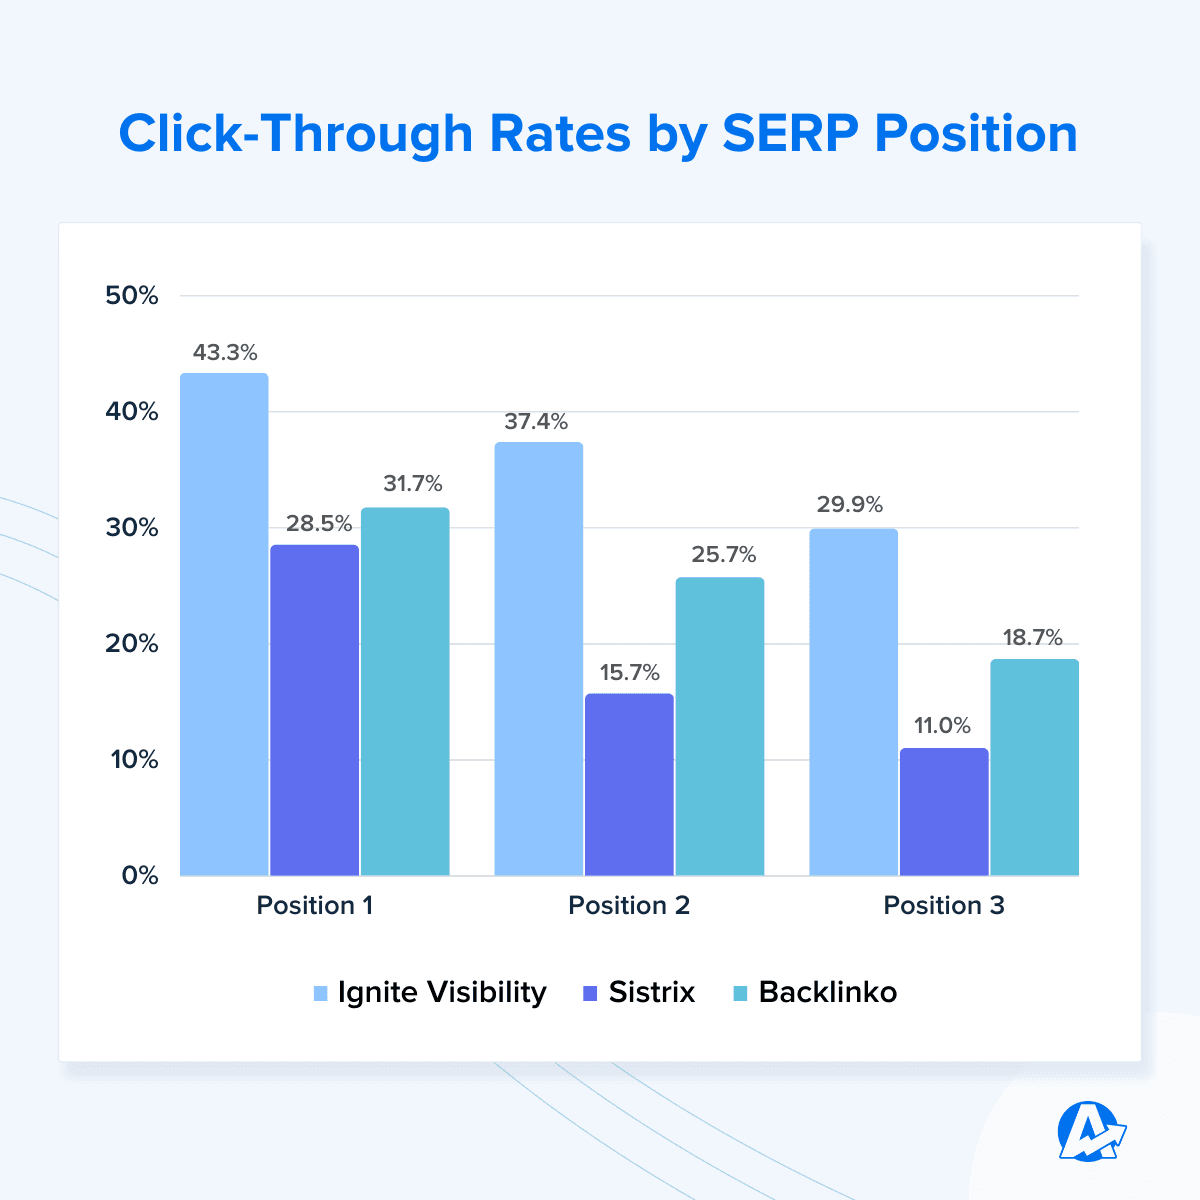
Because the CTRs are vastly different based on ranking position, it’s important not only to see how things have changed over time but also to see which are growing into the sweet spot of positions 1-3 and which have fallen into the search engine wasteland of 51 and above.
How To View the Ranking History for a Specific Keyword
By tracking the detailed ranking history of individual keywords, you:
Uncover valuable trends,
Seize untapped opportunities,
Connect the dots between SEO optimizations and ranking improvements, and
Demonstrate your agency's impact through compelling evidence-based reporting.
Here we’ll show you step-by-step how to view your clients’ ranking histories for a specific keyword in AgencyAnalytics. (If you haven’t already, sign up for your free 14-day trial and follow along!)
Step 1. Access the Rank Tracker Module in AgencyAnalytics
To access the ranking history of a specific keyword, begin by navigating to the SEO >> Rank Tracker module within the client setup. Locate the keyword table and simply scroll down to find the keyword you're interested in. Click on the desired keyword to instantly view its comprehensive website ranking history.
Step 2. Visualize Keyword History
After clicking the desired keyword, you will be directed to the dedicated ranking history page.
On this page, you have the option to view the keyword position history presented either as a visually informative line graph at the top or as a detailed table right below for that particular keyword.
Use the format that best suits your needs and easily analyze the performance of the keyword and positions history over time.
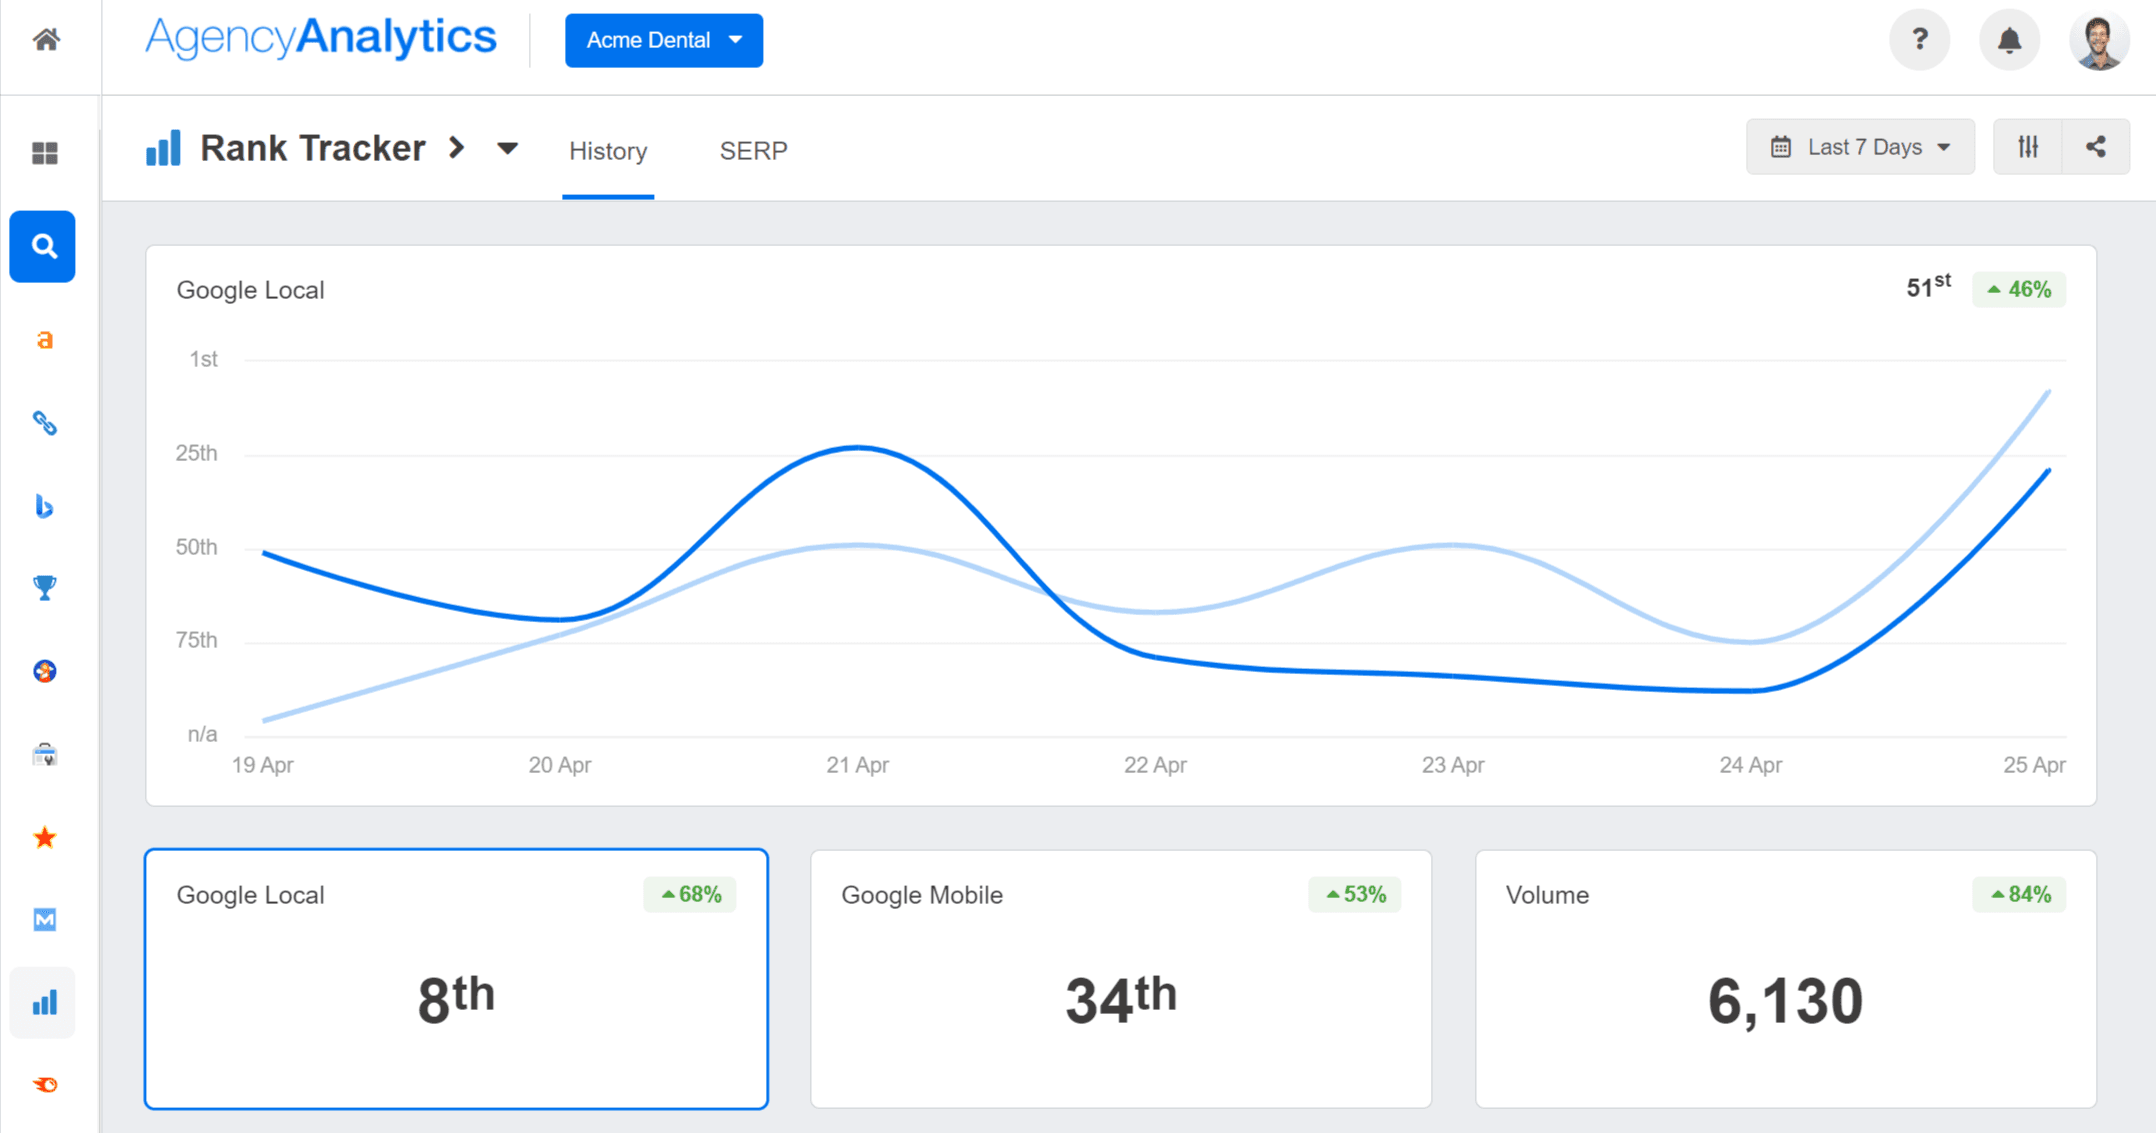
Step 3. Click the Time Period Selector
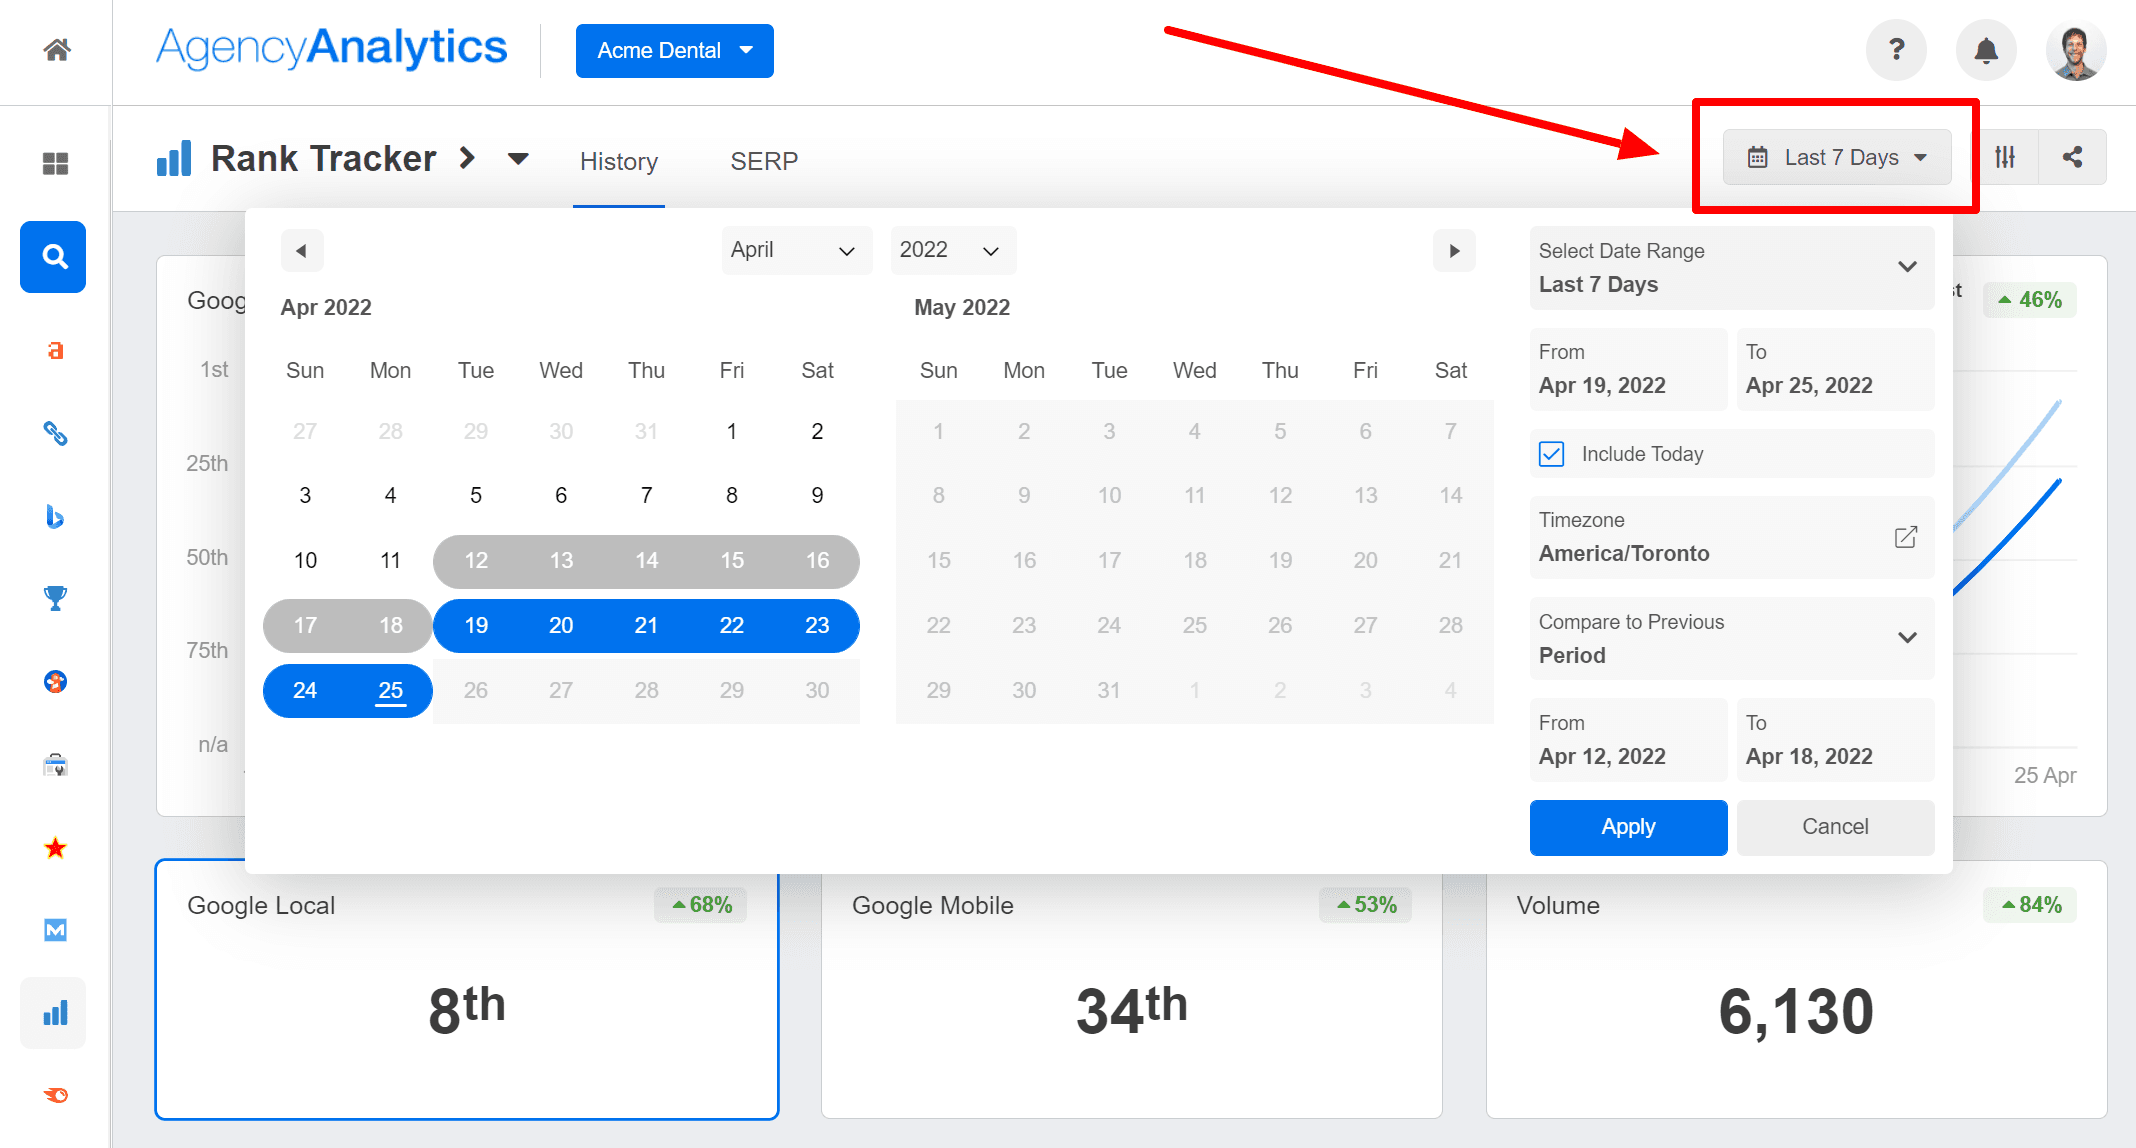
To explore the keyword ranking history for a specific period of time, simply use the time period selector. See how the current keyword ranking compares to a week ago, a month ago, or more.
By clicking on the time period selector, you can customize the view to display the ranking history for the desired timeframe.
This allows you to focus on specific intervals and gain deeper insights into the performance trends and fluctuations of the keyword during that selected period.
Step 4. Explore Advanced Configurations
To further customize the displayed SEO metrics in the table for the selected keyword, click on the "Settings" icon. Then choose and configure the historical metrics that are presented in the table.
Tailor the ranking history data to your specific needs and focus on the metrics and search engines that are most relevant for your analysis and reporting.
And there you have it!
Create stunning rank tracker reports within seconds and schedule them to be sent on a daily, weekly, monthly, or quarterly basis. Try AgencyAnalytics free for 14 days!
I love AgencyAnalytics because it really allows us to streamline everything for both internal and external teams. The beautiful, responsive widgets help us display data to clients easily and help paint a full picture of the data. I can’t recommend this software enough.


To effectively track and analyze historical data, it is crucial to add relevant keywords to your tracking system. By including the desired keywords in your keyword ranking tool, you lay the foundation for monitoring their keyword performance over time.
With keyword tracking as the starting point, you unlock the power of historical data and gain insights that drive your agency's success in the ever-changing landscape of organic search engine rankings.
How To Add Keywords for SERP Tracking
Want to get started gathering historical keyword ranking data? The simple process of adding keywords initiates the collection of valuable data. Over time, this data helps you uncover trends, identify fluctuations, and make informed decisions to optimize your SEO strategies.
Let’s go through the steps for adding keywords based on your client’s rank tracking location.
Step 1. Adding Keywords
To begin adding keywords, locate and click the "Add Keywords" button. Please note that the button's placement may vary depending on whether you're working with a brand-new client or an existing one.
How To Add Keywords in a New Client Campaign
If you're setting up a brand new client campaign, you'll find the "Add Keywords" button positioned prominently in the center of the Rank Tracker module screen.
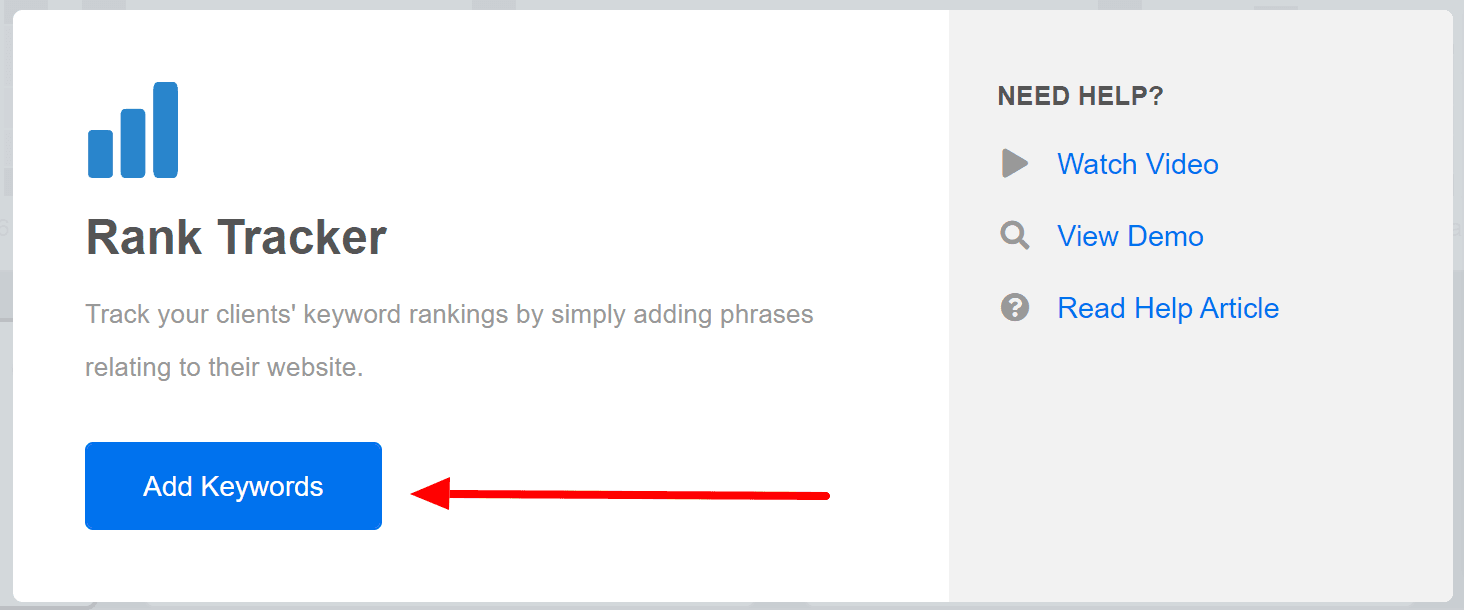
It's easily accessible and clearly visible, allowing you to add keywords seamlessly.
How To Add Keywords in an Existing Client Campaign
However, if you're working with an existing client campaign, the "Add Keywords" button will be situated towards the upper right-hand side of your Rank Tracker module screen. Look for it in that area to initiate the keyword addition process.

Once you click the "Add Keywords" button, the "Add Keywords" wizard will open, guiding you through the process. In Step 1 of the wizard, you'll find a text field where you can type or paste the list of keywords you wish to add. Simply enter the keywords into the field, ensuring each keyword is separated by a comma or on a new line.
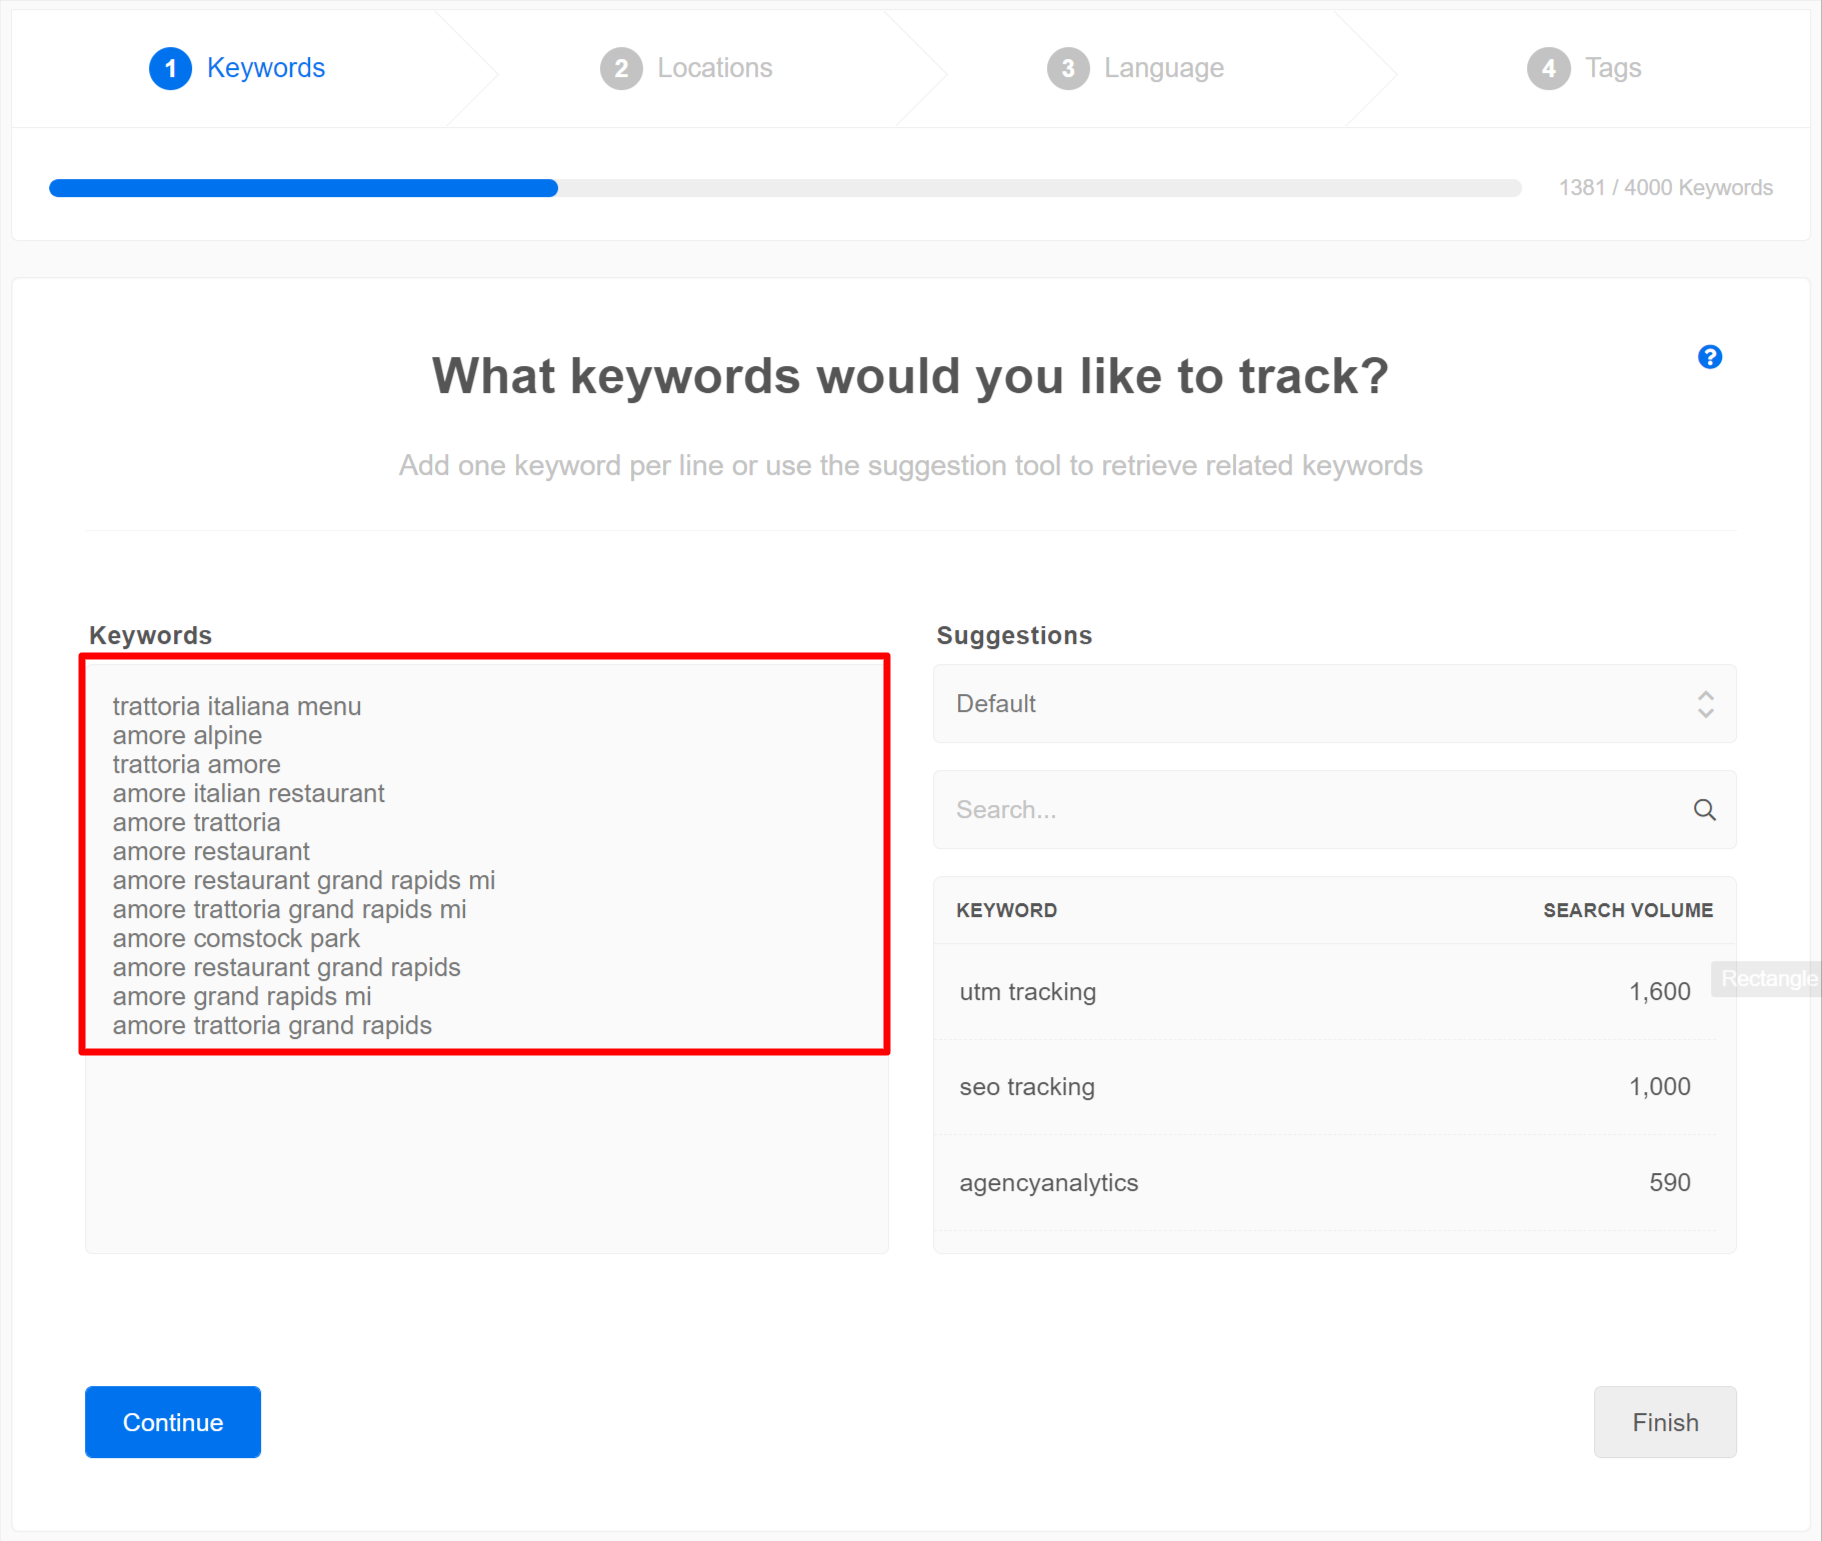
After entering the keywords, click on the "Continue" button to proceed to the next step of the wizard to configure additional settings for the keywords you've added.
Step 2. Choose the Keyword Location(s)
Moving on to Step 2 of the "Add Keywords" wizard, you'll have the opportunity to select the specific location(s) for which you want to track and emulate SERP rankings, which is essential when you are tracking geo-specific keyword rankings for a local business.
If you have previously added keyword/location pairings to the client campaign, the locations you used before will be pre-populated, making it easier to select the desired locations. This saves you time and ensures consistency in tracking across clients.
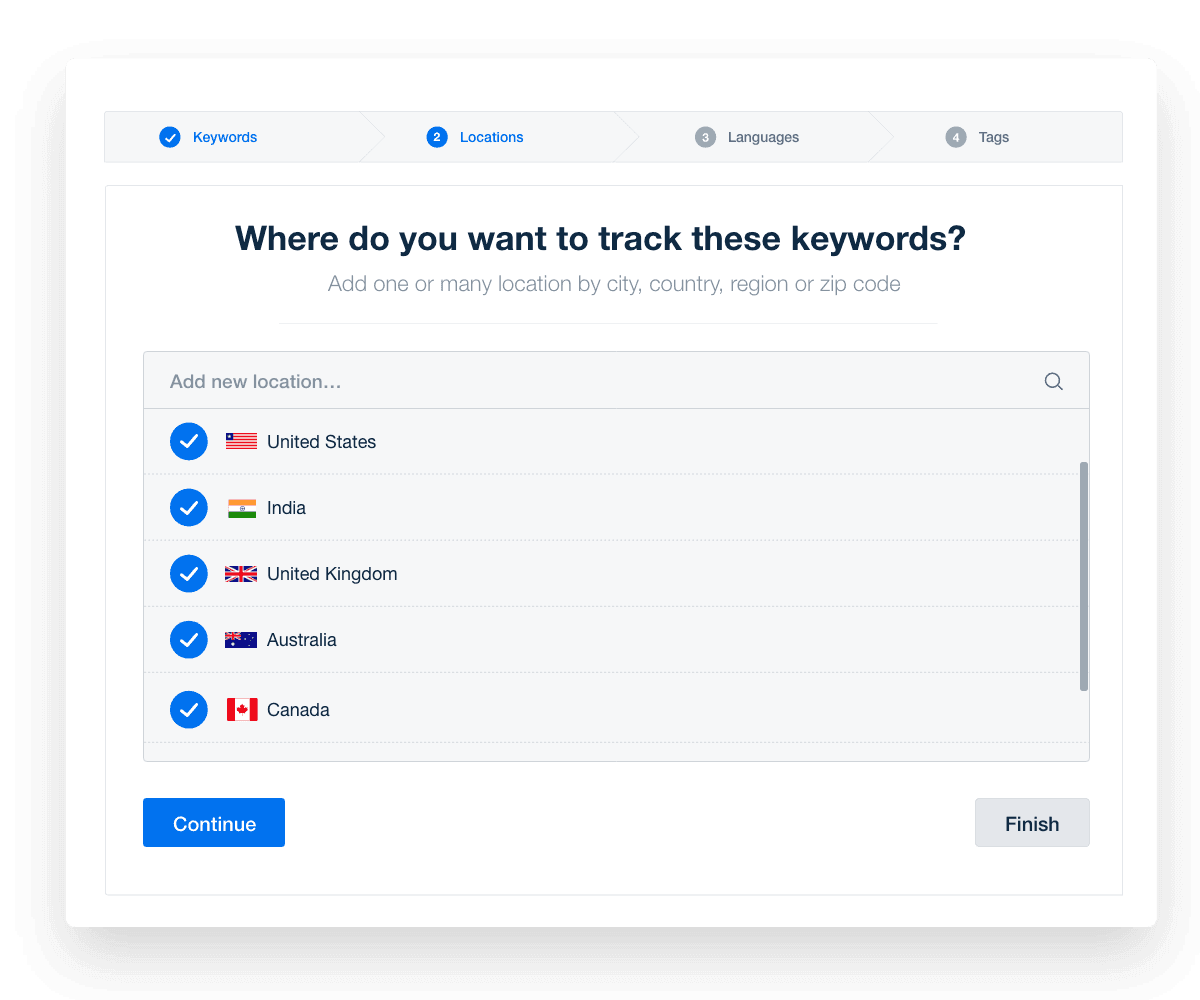
Keep in mind that each keyword/location pairing counts separately toward your account's keyword limit. This ensures that you can effectively manage and track your keyword usage within the limitations of your account. (Read more about location settings here)
Click "Continue" after selecting the locations to proceed to the next step of the wizard, where you can further customize and refine the settings for your added keywords.
Step 3. Select the Language
To choose a language, simply select the desired language from the available options. If you need more information or details about language settings, you can refer to the dedicated section for language settings.
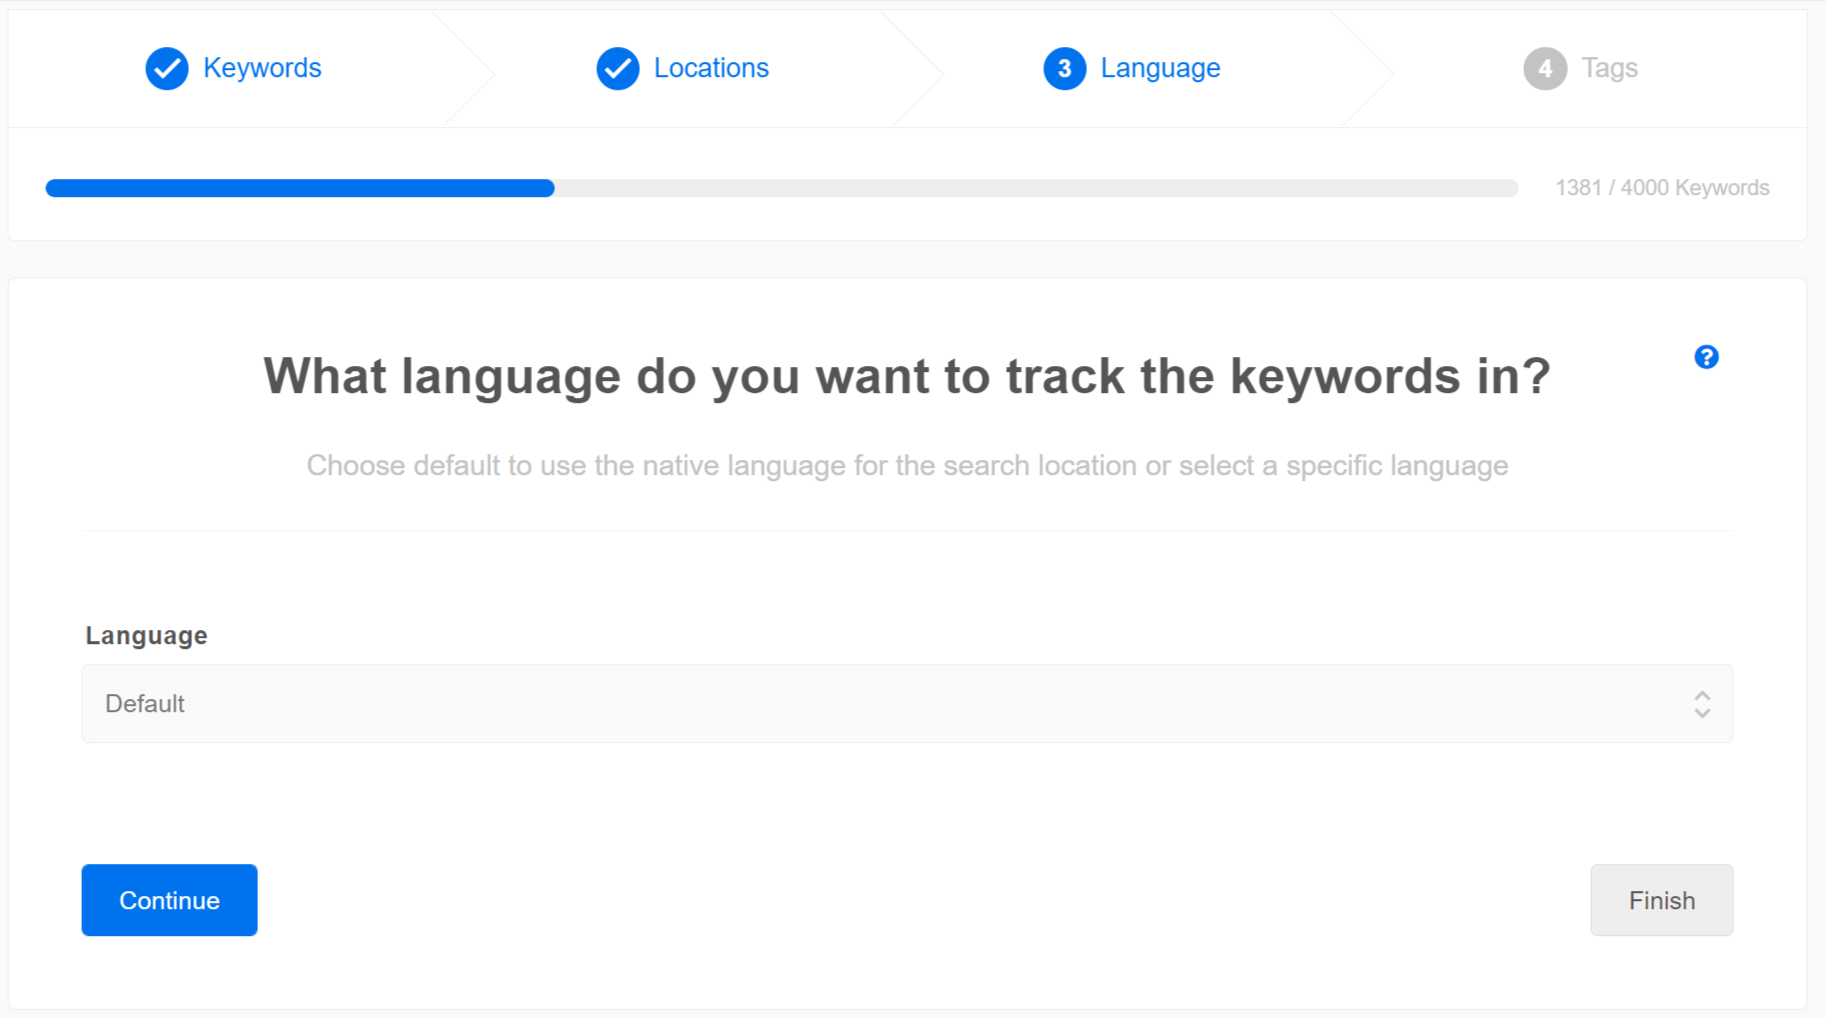
Next, hit the "Continue" button to proceed to the final step of the wizard, where you can add any optional tags or labels to further organize and categorize your keywords effectively.
Step 4. Adding Keyword Tags
Finally, you have the option to add tags to the keywords you've entered. This feature enhances the overall organization and accessibility of your keywords, making it easier to track, analyze, and report on specific keyword groups or campaigns over time.
Tags serve as labels that help with organizing, sorting, and categorizing your keywords effectively. They provide an additional layer of control and allow for easy identification and management of specific groups or themes within your keyword list.
For example:
By grouping high-priority or high purchase intent keywords together, the agency keeps a closer watch on these valuable keywords and prioritizes SEO efforts to focus more on these high-performing keywords.
If a competitor ranks well for certain keywords, using tags to monitor these keywords helps an agency understand the competitive SEO strategy and learn from it.
Tags can help identify the results of content optimization processes, such as targeted blog posts or product pages getting an SEO overhaul, to quickly see the positive results.
Tagging newly targeted keywords provides some historical data on how long it takes for a client’s content to get indexed and ranked, which can inform strategies to help speed up the indexation process.
You can apply tags to the keywords during the initial keyword addition process in the "Add Keywords" wizard. Alternatively, you can also add or modify tags at any time later through the main Rank Tracker section.
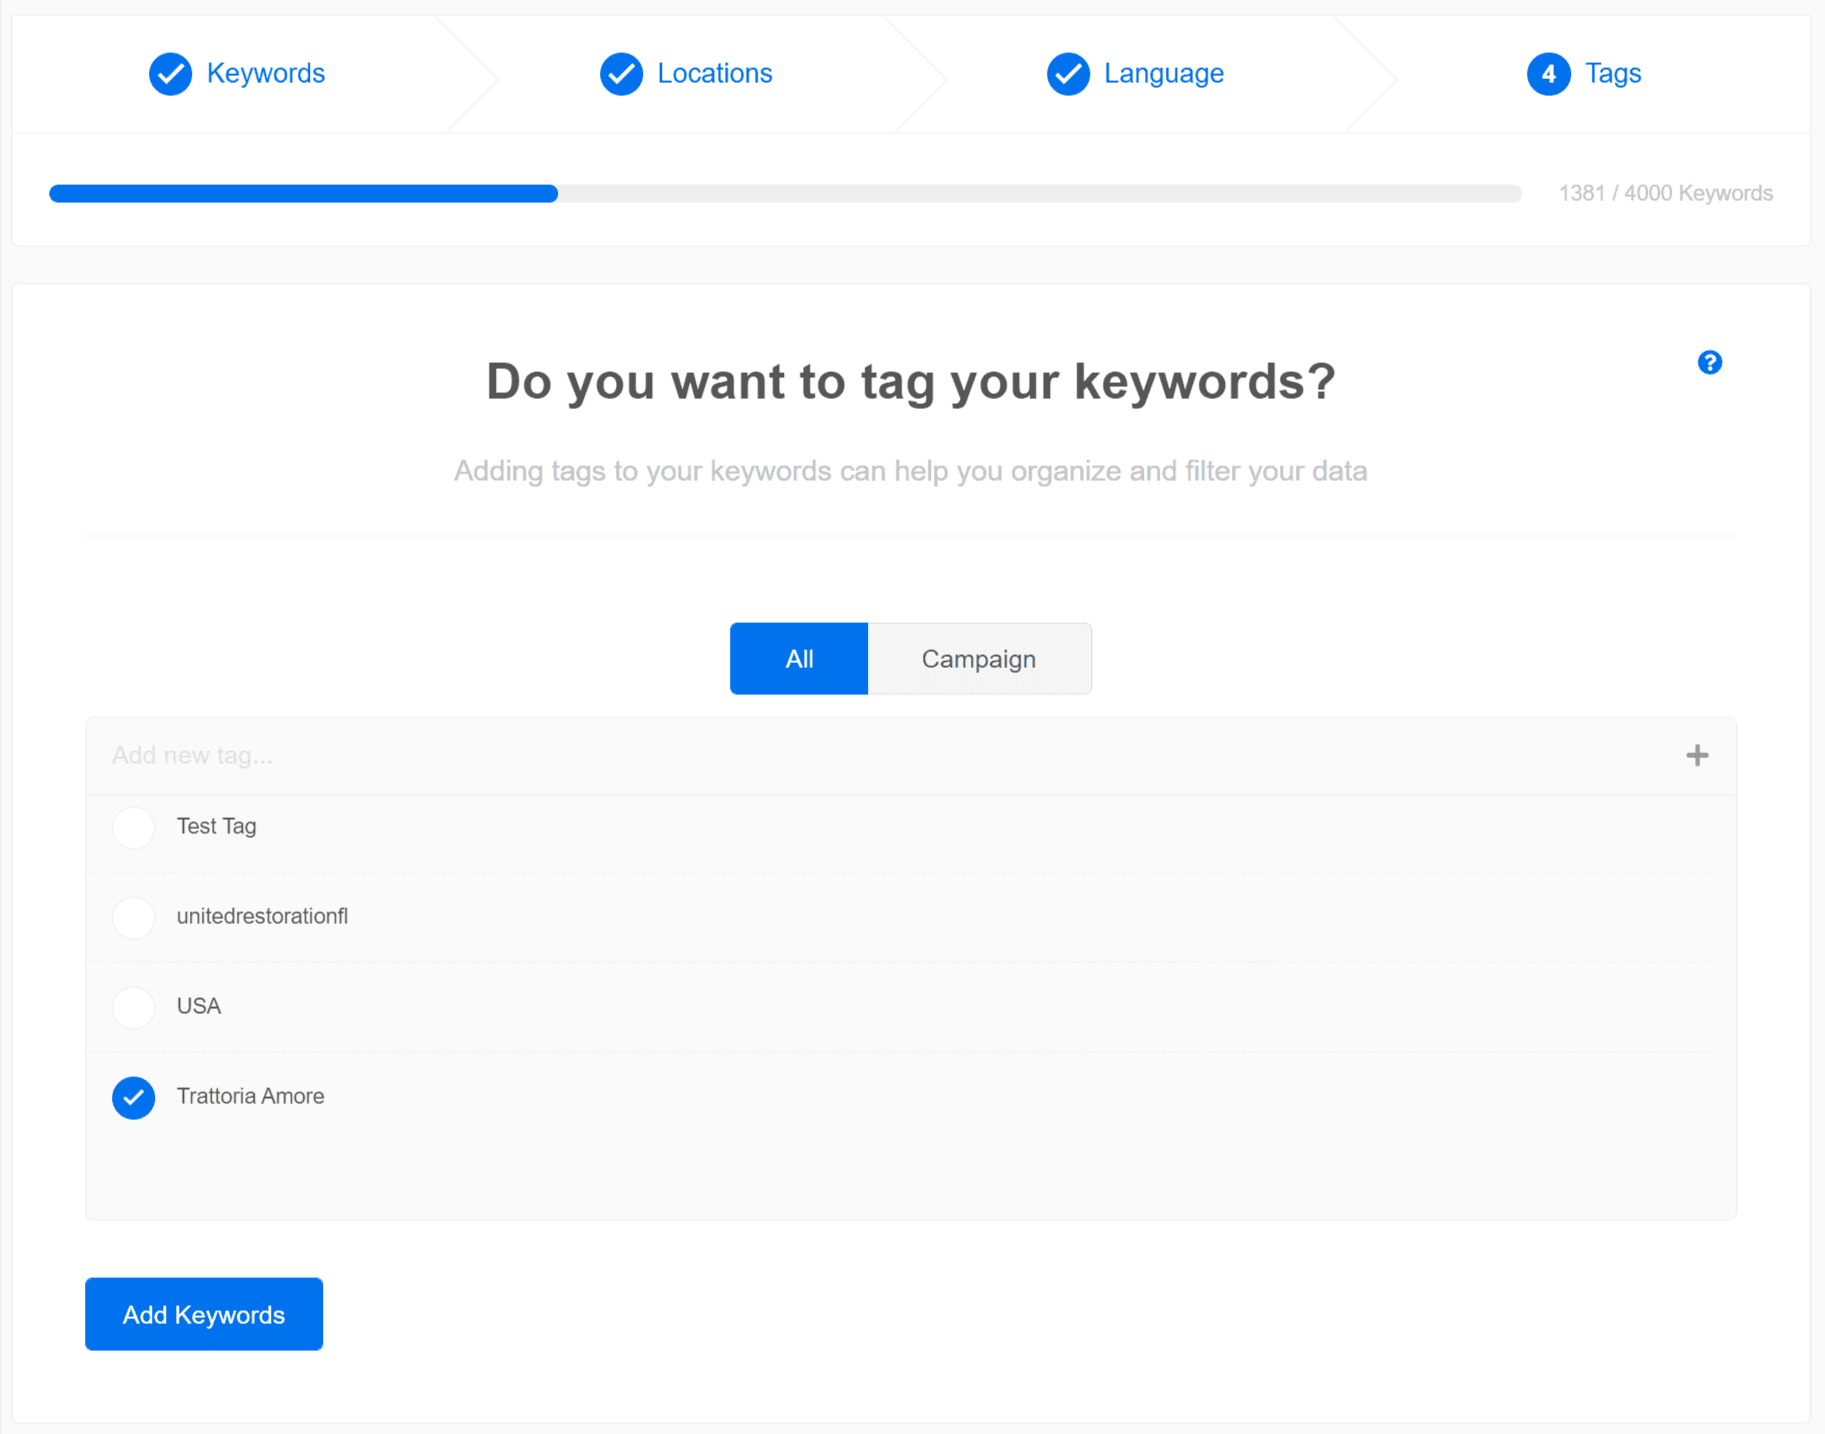
Using tags streamlines your keyword management and gives you better control over your clients’ SEO growth.
After clicking "Add Keywords,” your keywords are added to your rankings table and then crawled to determine their current positions.
For each new keyword, you will notice a "clock" icon indicating that the initial ranking data is being fetched. The time required to complete this initial rank-fetch process may vary depending on factors such as the current site load and the number of keywords being added.
If you are adding a substantial number of keywords or performing the addition during peak hours, we recommend allowing up to 2 hours for the initial rank fetch to be completed. This timeframe ensures that the system can efficiently gather the necessary historical ranking data for your newly added keywords.
Rest assured that our aim is to provide accurate and up-to-date website ranking history information for your SEO analysis, and we appreciate your patience during the initial data fetching process. Once the initial fetch is complete, you can start leveraging the insights provided by the rank tracker to optimize your SEO strategies effectively.
Once the keywords are added, the rank tracker will begin daily data retrieval. This continuous tracking will swiftly build a comprehensive ranking history, allowing you to observe the dynamic changes in keyword positions over time.
By regularly monitoring this evolving ranking history, you gain valuable insights into the performance and trends of your keywords, empowering you to make informed decisions and optimize your SEO strategies effectively.
How To Bulk Import Keyword Data from Other Rank Tracker Tools
If you’re switching to AgencyAnalytics from another reporting tool, the steps below show you how to import your historical keyword rankings from supported providers into AgencyAnalytics, ensuring that your client’s entire ranking history for multiple keywords is preserved.
To bulk import historical keyword rankings that you’ve exported from another provider into AgencyAnalytics:
Step 1. Access the Data Import Feature
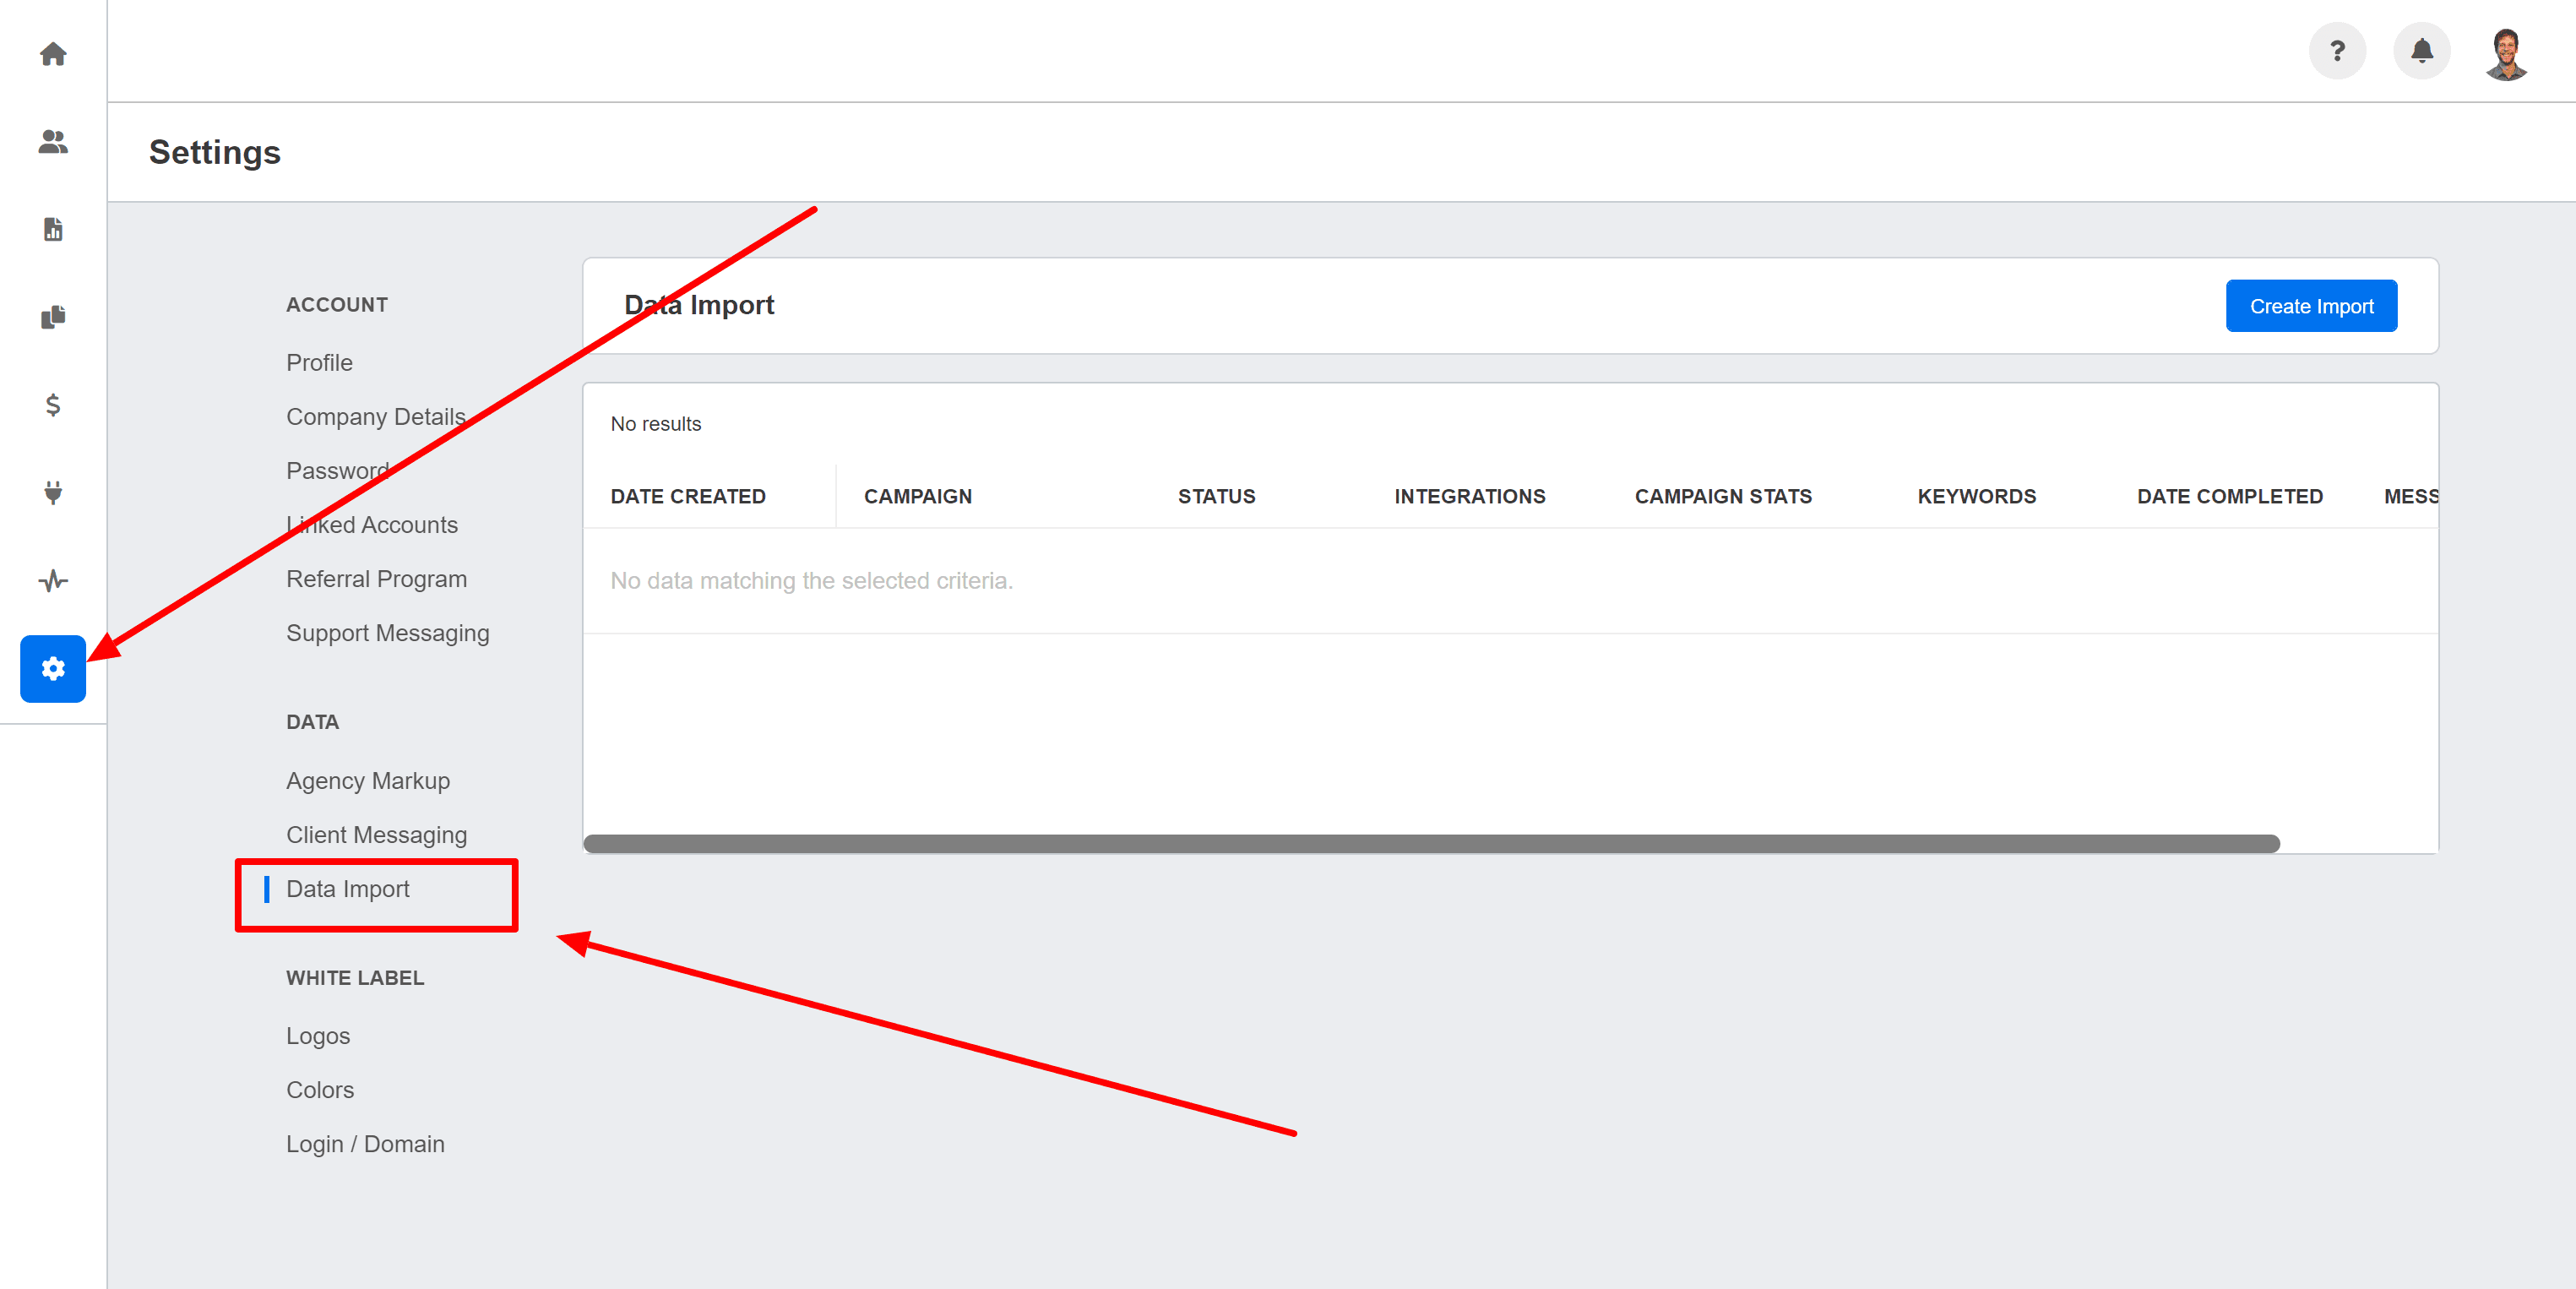
From your AgencyAnalytics root dashboard, select "Data Import" from the sidebar. Then, click on "Import" and follow the prompts.
Step 2. Choose the Source
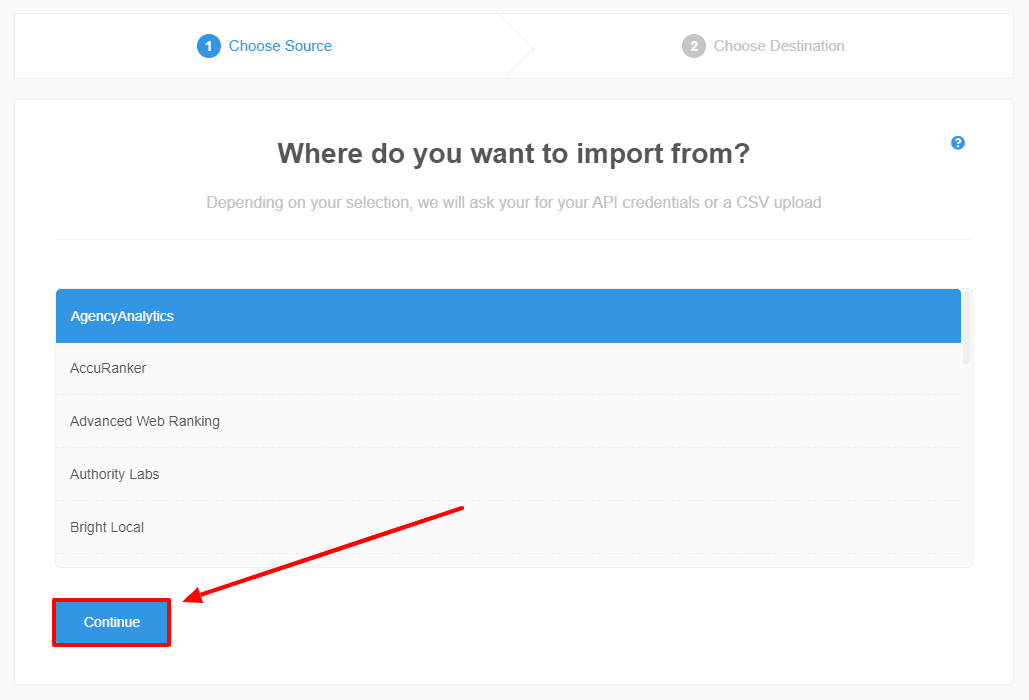
In the import wizard, you will be prompted to choose the source of your data. Select the appropriate provider from the list of supported providers or choose to manually import the ranking history data if your provider is not listed.
Step 3. Enter an API Key if Necessary
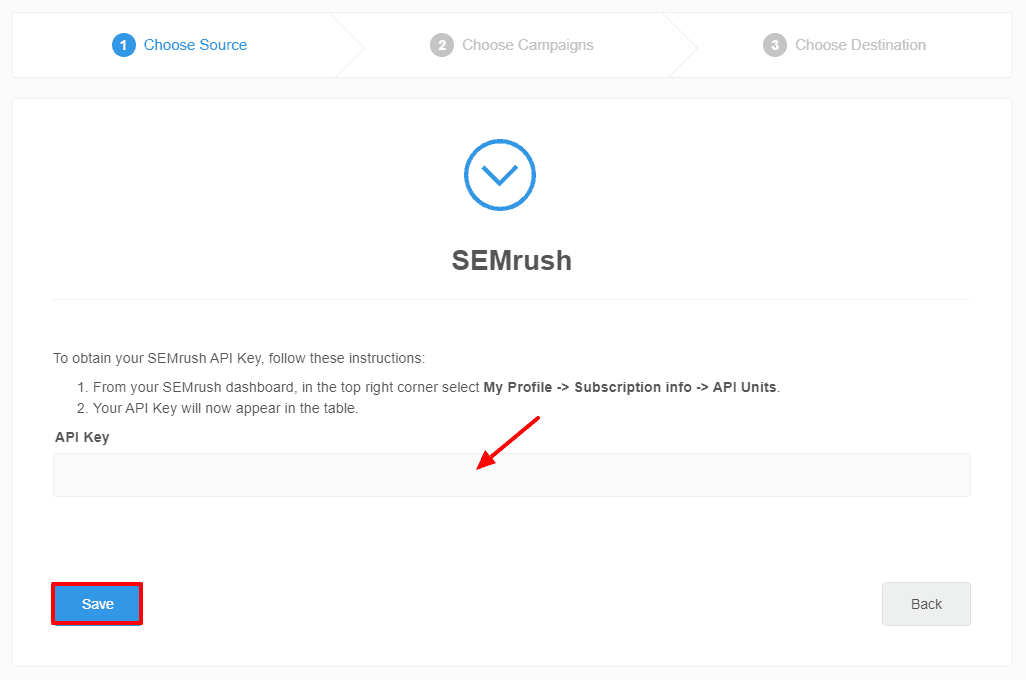
Depending on your rankings provider, you may need to enter an API key to access the ranking history data or upload a file containing your keyword data. Follow the instructions provided on the screen. You also have the option to upload a file containing your keyword data instead:
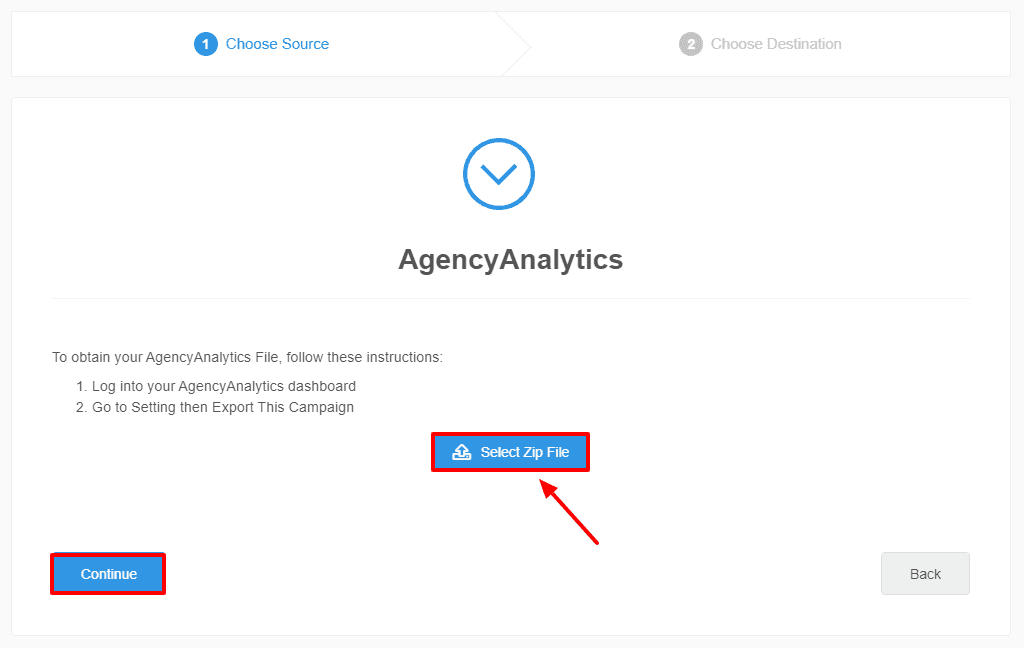
Step 4. Select the Destination
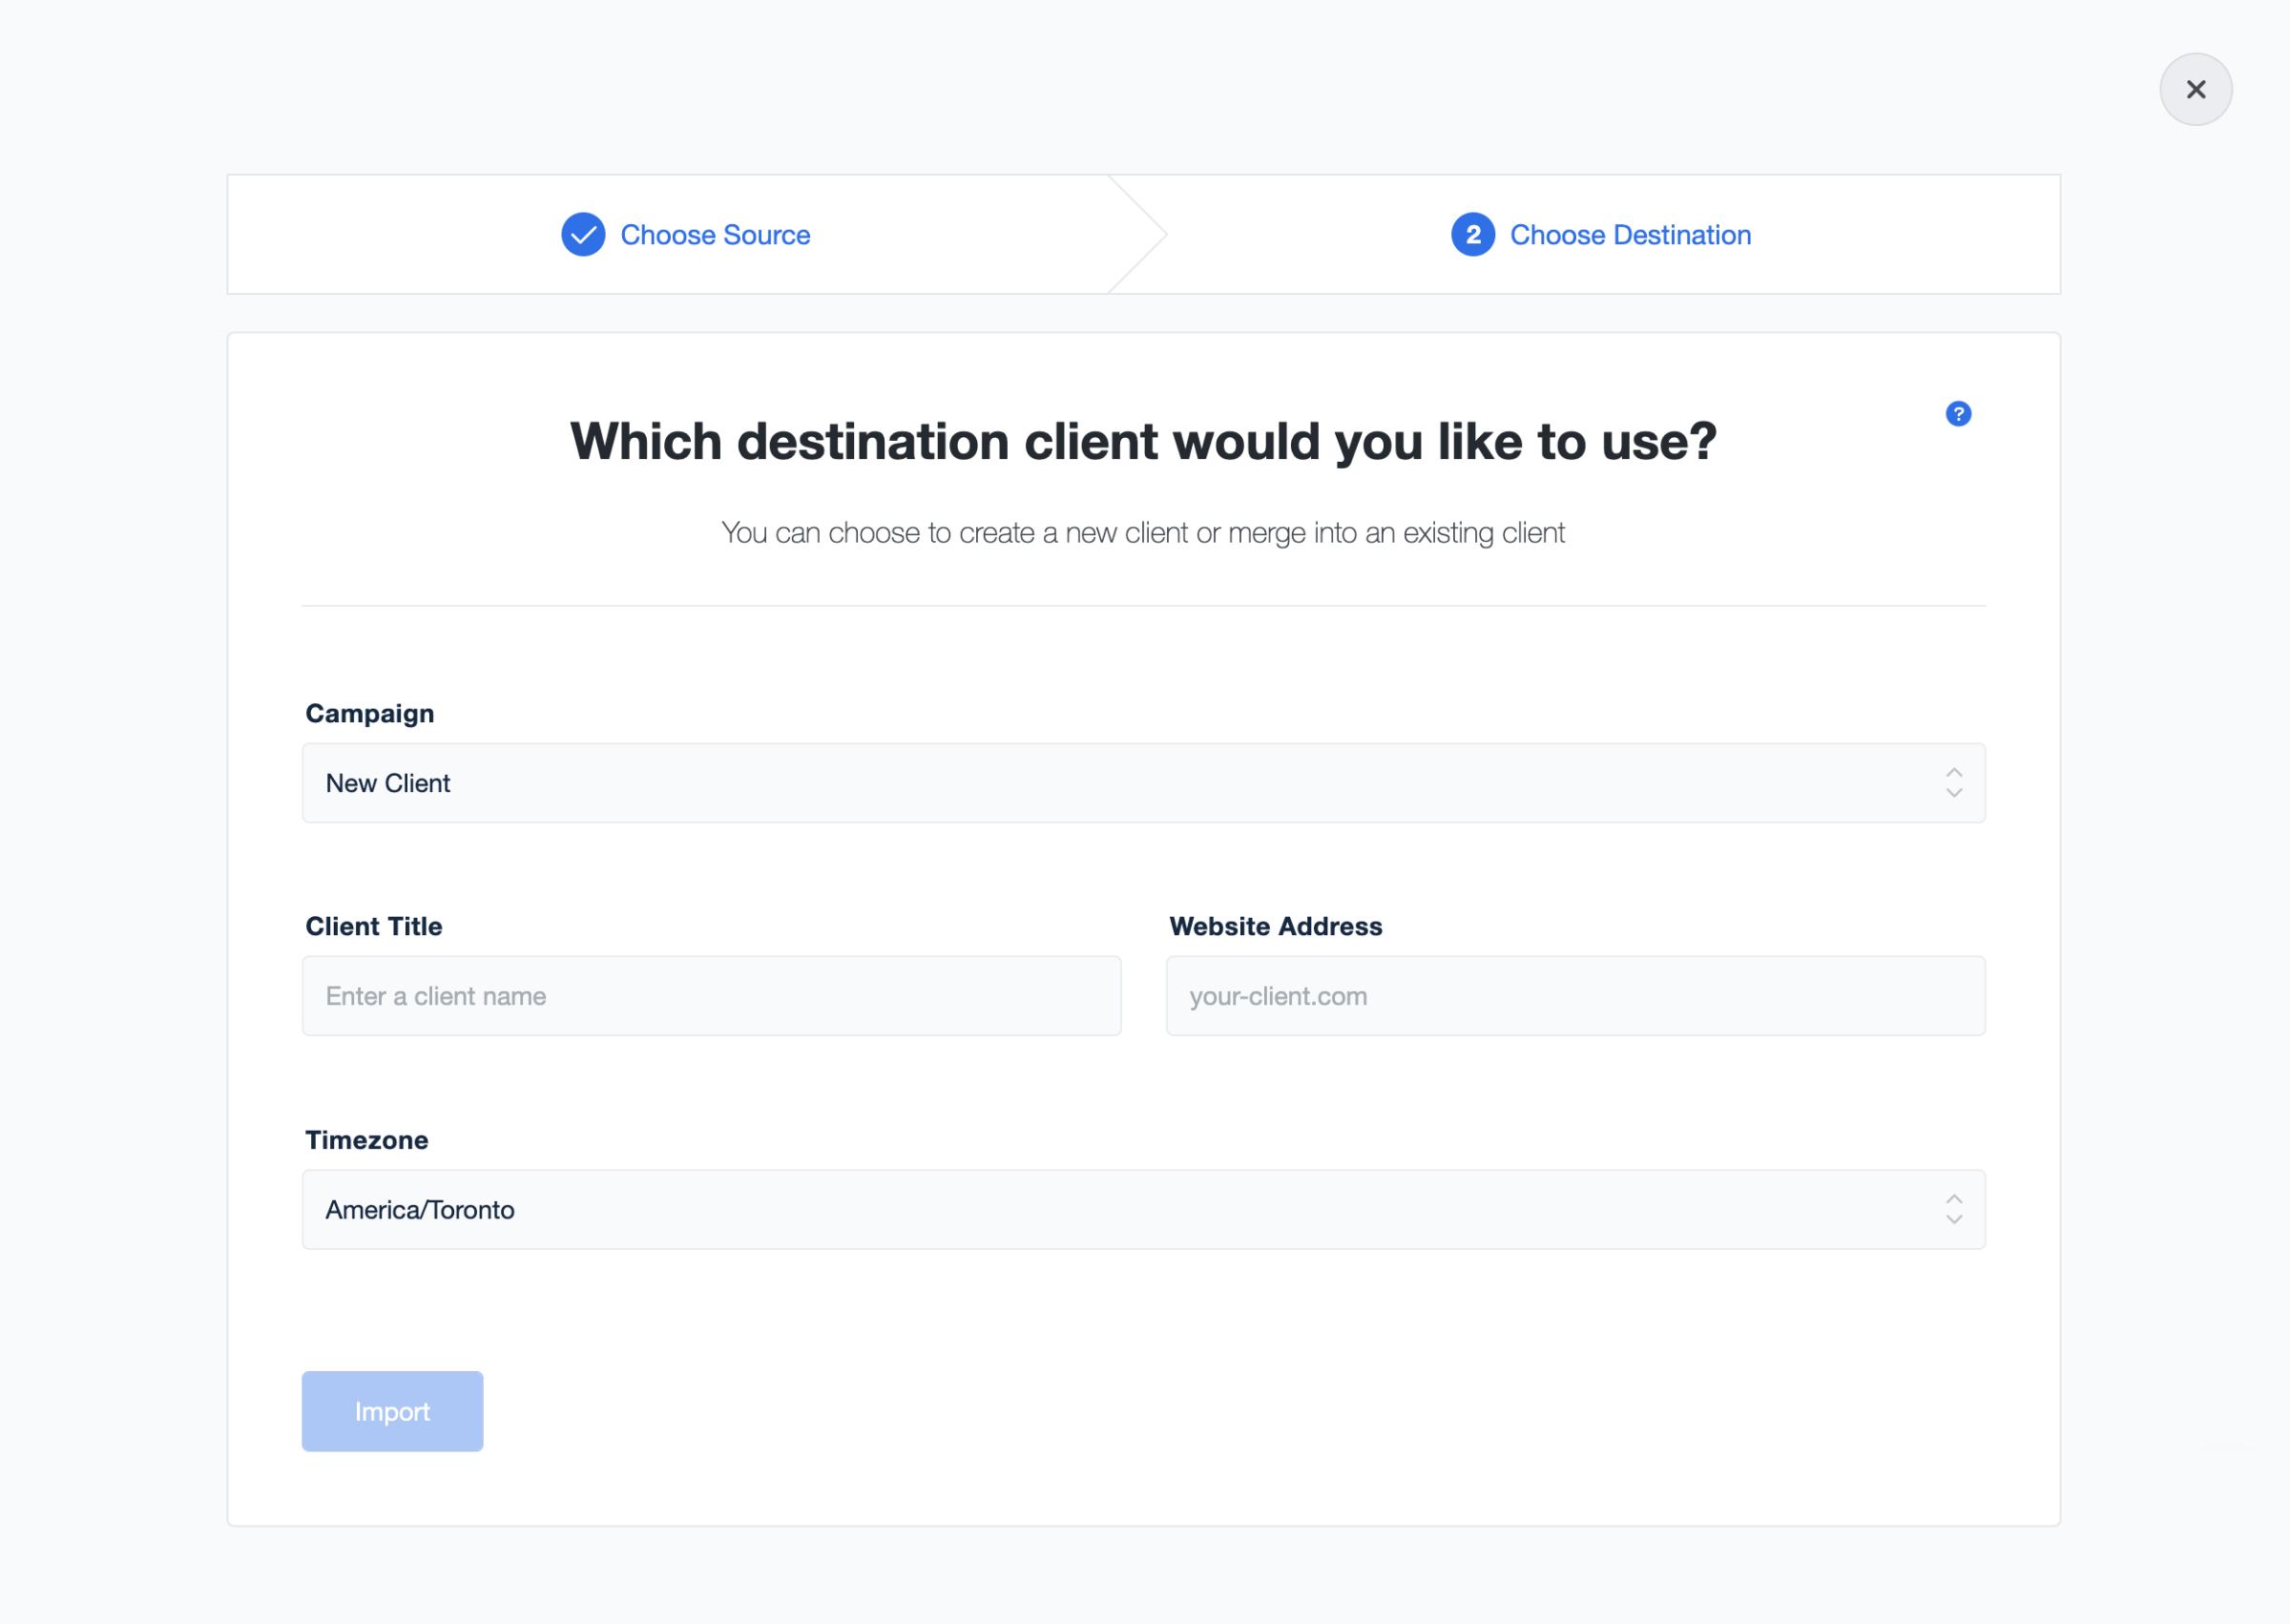
After specifying the data source, you will be prompted to select the client you want to add the ranking history data to. You can choose to import the data into an existing client campaign or create a new one.
Step 5. Configure Additional Settings
Depending on the provider and import method, you may need to set the keyword location and specify the start date for the historical import.
Step 6. Monitor the Import

Once the import is initiated, monitor the status of the import from the Data Import dashboard. The process will be marked as "Complete" when the keyword rankings are fully imported.
Continue tracking and analyzing your keywords using AgencyAnalytics' Rank Tracker, and continue leveraging the power of historical data for your SEO efforts.
Deleting Keywords from Tracking
Made a mistake, want to remove irrelevant keywords, or need to manage your keyword limit? It’s quick and easy to select the keywords you wish to remove from tracking.
How To Remove Keywords
First, tick the boxes to the left of the keywords that you would like to remove.
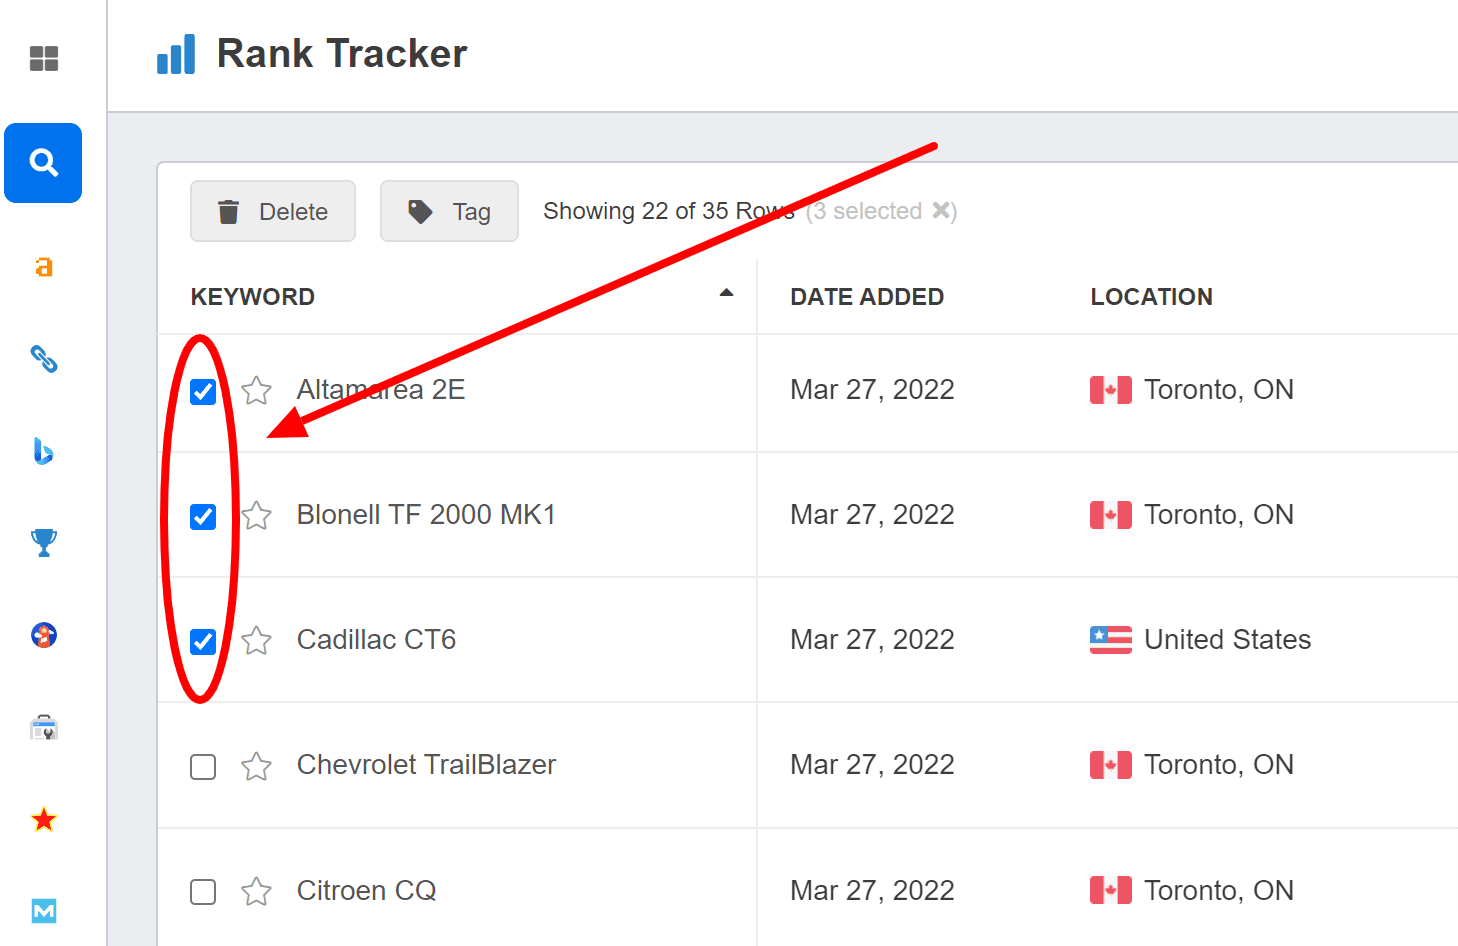
Alternatively, if you want to delete all keywords, you can select the option to tick all checkboxes with just a few clicks.
💡Quick Tip:
Clicking on a single keyword and then pressing Shift while clicking on another keyword further down the list will select all the keywords in between. This is perfect for deleting a group of keywords, such as those ranking 51 or above, or a location that is no longer relevant to your client’s operations.

Once you have selected the desired keywords for deletion, the "Delete" button will appear at the top of the keyword table. Click on this button and confirm your choice to remove the selected keywords from tracking.
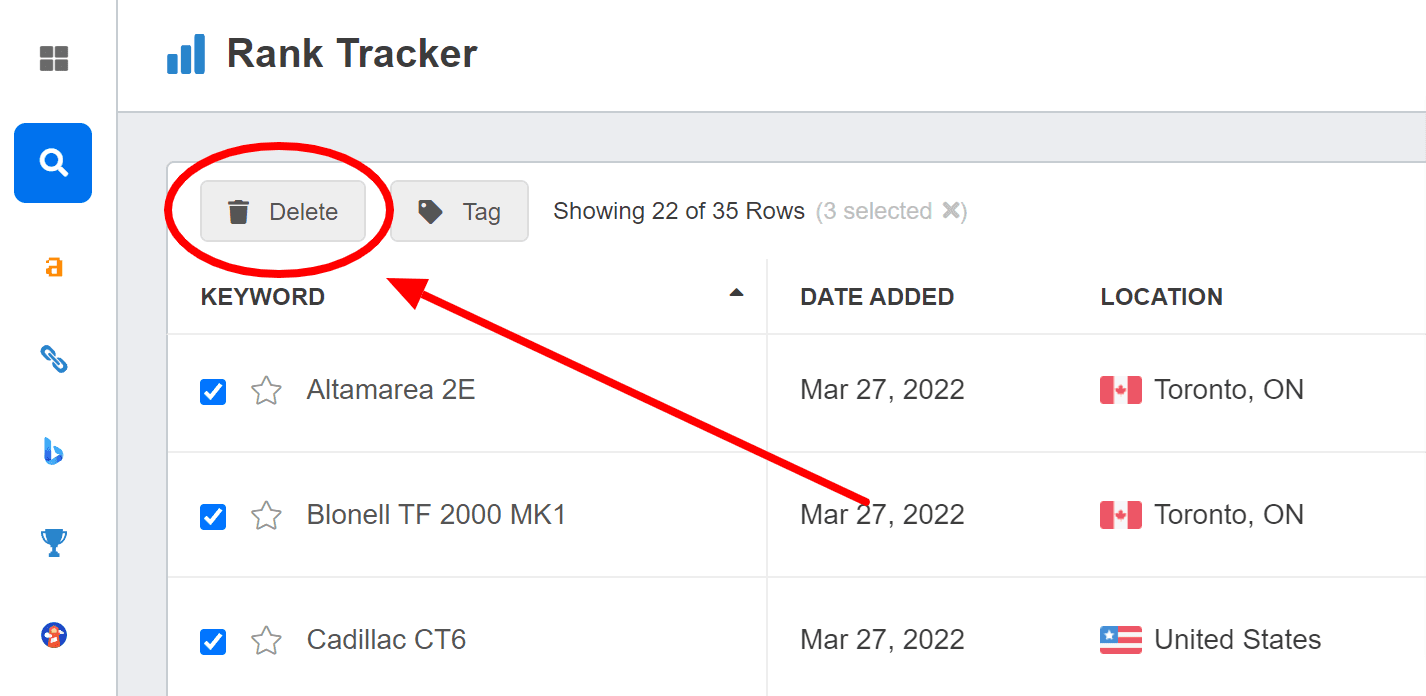
Our user-friendly deletion process allows you to swiftly manage your keyword list and stay within your desired keyword limit. But remember that once you delete keywords from the Rank Tracker, they cannot be recovered, which means you will lose the ranking history data. Therefore, exercise caution and ensure that you only delete the keywords you genuinely want to remove.
Agency Tip: Back up your data periodically by using our data export function to not risk accidentally deleting valuable keyword history data. Need to restore keyword data that you previously exported? This article will walk you through it.
The Takeaway: Optimize Your Clients’ SEO Strategies With Confidence
Agencies should preserve ranking history to drive success for their clients by:
Benchmarking against progress to optimize SEO strategies,
Making data-driven decisions, and
Showcasing measurable results to clients.
Empower your team and exceed client expectations by embracing the transformative benefits of preserved ranking history. Take action today and propel your agency toward unparalleled SEO excellence.
Don't miss out on the opportunity to harness the full potential of your SEO endeavors and achieve outstanding results for your clients.
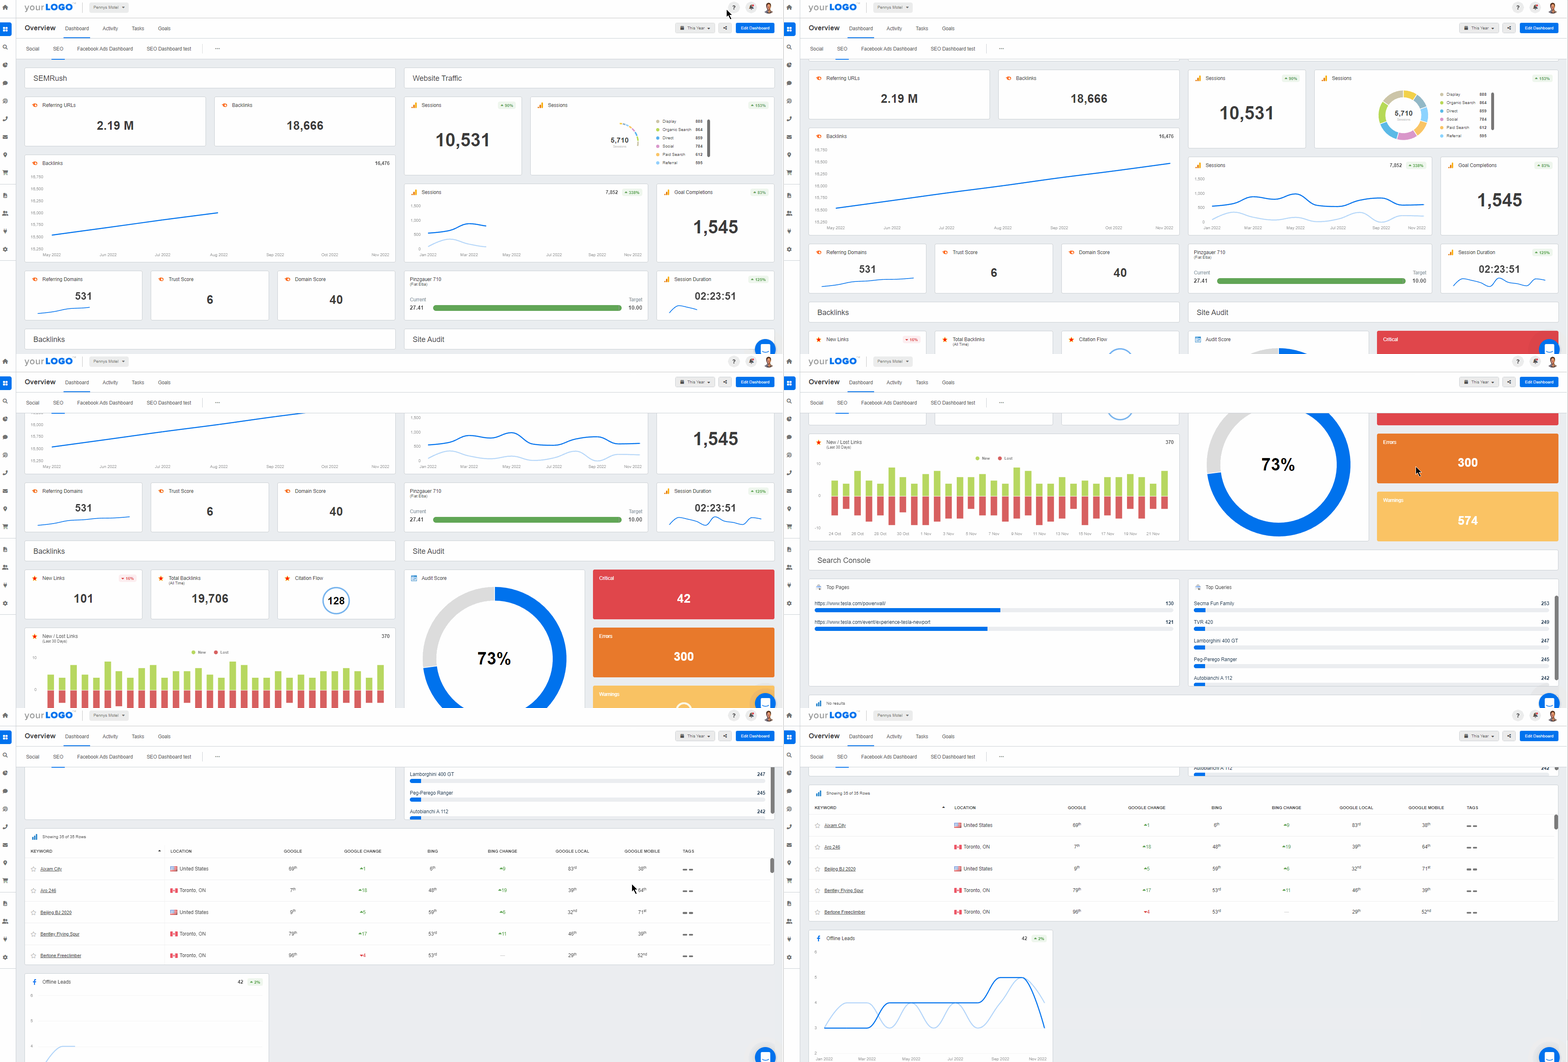
With dozens of templates to choose from, combine your SEO data with 80 other marketing channels to show the full-picture impact your agency is bringing clients. Try AgencyAnalytics free for 14 days–no credit card required.

Written by
Melody Sinclair-Brooks brings nearly a decade of experience in marketing in the tech industry. Specializing in B2B messaging for startups and SaaS, she crafts campaigns that cut through the noise, leveraging customer insights and multichannel strategies for tangible growth.
Read more posts by Melody Sinclair-BrooksSee how 7,000+ marketing agencies help clients win
Free 14-day trial. No credit card required.


